FREE Standard Shipping On All Orders $100 or More!*
Winter Pool Safety Cover Installation

Pool safety covers will keep children, animals, and debris out of your pool. Safety covers also make your pool opening faster, easier and take fewer chemicals.
Here's how to install a pool safety cover on your own swimming pool. Anyone can install a rectangle safety cover. Freeform safety covers are more involved but still can be quite successful as a do-it-yourself project.
Materials Needed:
- Heavy-duty rotary hammer drill with 3/4-inch masonry drill bit
- Chalk line and piece of chalk
- Tape measure and hammer
- 50-100-foot extension cord
- Several 5 gallon buckets
- Shop Vac or garden hose
Rotary Hammer Drills
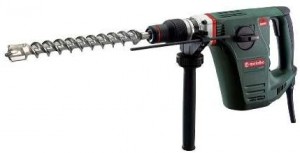
Don't use a small, hand-held hammer drill; that can take 20 minutes on each hole. Visit a local rental shop and tell them you need a rotary hammer drill and a long, sharp 3/4-inch masonry bit. Rent by the day or half day. Rent on Saturday morning, and if the shop is closed Sunday, as many are, return Monday morning, for one-day rental.
Longer drill bits reduce stooping over the drill, and can lessen operator wear and tear. Sharper bits will cut a cleaner hole and drill them faster, with less chipping around the hole. A small amount of chipping is normal, if you want less insist on a sharp bit, or buy a new drill bit for use with your rental drill.
Getting Ready to Drill

Open the box and pull out everything: cover, cover bag, anchors, springs, tamping tool, hex key and installation rod.
To install a safety pool cover, begin by removing any obstructions around the pool, like ladders or handrails. Clear the deck of any furniture that will be in the way of the installation process.
Wait to lower the water level in the pool until after you have installed the pool cover. Floating the pool cover on the water, centering it over the pool while pulling out the packing wrinkles is the first step.
Pull the cover to one end of the pool and pull it across the pool so that the cover begins to float on the surface. Pull up all edges up onto the coping, or edge of the pool, and lay the straps flat on the pool deck.
Spend 10 minutes centering the cover around all sides. Use the seams running perpendicular to each other as a guide. They should be running straight across the cover width and length. The cover should be overlapping the pool edge equally all around, with no large wrinkles across the cover.
You can add some weights to the cover edge if needed to help, but if the water level is high enough in the pool, it should be able to float and still overlap the edge so that you can center the cover over the pool. If you decide to weigh it down around the edges, use buckets of water, water bags or four-by-four lumber.
Walk the bag of cover springs around the pool, dropping one spring next to each strap. Install all springs onto the straps at the same length of strap. While doing this, make micro-adjustments of the cover with small tugs on the straps to improve centering of the cover over the pool.
Drilling the Holes
Be certain with your placement of the holes before you drill. If you do end up misdrilling some holes, you can always drill a new hole, move the anchor, and fill the other hole with mortar mix.
It's helpful to mark the anchor hole with a Sharpie or chalk, or place the anchor on the deck in the exact location, before you start to drill. Hold the drill firmly so that it doesn't bounce around. This will help reduce chipping on the surface.
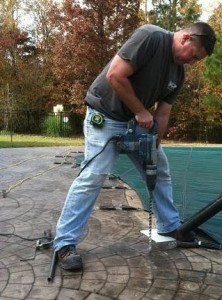
Each hole will take 30-60 seconds to drill, depending on the age and content of the concrete. A pile of dust will build up around the hole as you drill; you can spray it off with a hose, or use a vac/blower to either vacuum it up or blow it away. The dust needs to come out of the hole, or you won't be able to fit the anchor.
Some hammer drills will have a bar that you can use as a depth gauge, or you can wrap a piece of electric tape around the drill bit. The hole needs to be almost 2 inches deep. In thin areas of a concrete deck, it's not uncommon to break through the underside of the pool deck.
As you drill the holes, bear down on the drill with your weight and continue to hold it firmly. If the drill hits some rebar or heavy rock, it may bind up and even though the drill bit stops, the drill keeps turning. This can catch you off guard and slam into the side of your knee. So, hold on tightly!

Drill just a few anchors at a time, and then switch sides and drill the anchors opposite the ones just drilled. Wait until you drill a complete set of anchors, opposite each other, to connect the springs.
After attaching springs to the anchors on both sides of the cover, adjust the straps as necessary, so the springs are 1/3-1/2 compressed.
Drilling Holes in Your Concrete Pool Deck
 Use a heavy duty rotary hammer drill, not a hand held drill.
- Hold the drill firmly; it can lock up if you hit some rebar.
- A piece of tape on your drill bit, at 1-3/4-inch, can serve as a depth guide.
Tamping Brass Anchors Into Your Concrete Pool Deck
 Use a garden hose, leaf blower or wet/dry vac to remove the concrete dust.
- Check hole depth with your tamping tool before inserting the anchor body in the hole.
- Separate the anchor into its two halves, use the tamping tool and hammer to press fit the anchor into the hole.
- After the anchor body is tamped into the hole, thread the insert piece of the brass anchor about halfway down.
How to Connect the Springs to the Straps

- Place the strap through the triangular end of the spring, with the rounded end pointing downward.
- Run the end of the strap through the slot closest to the strap.
- Turn the strap backward and pull it through the second slot.
- If you need to lengthen the straps, you can slide the buckle down toward the end of the strap.
- When connected to anchors, your springs should be about halfway compressed.
When all of your cover anchors have been installed and all of your springs attached, make final adjustments to the tension of the springs.
INSTALLING A FREEFORM POOL SAFETY COVER
If your cover was designed with cutouts for non-removable objects like slide legs or hand rails, or has been made to fit up against a raised wall or spa, you might begin by attaching the cover at those points first, or using these spots as a way to assist in centering the cover properly.
For freeform pools, you start drilling from the center and work your way to the outside, as opposed to rectangular covers (below) that start from the corners and then move in.
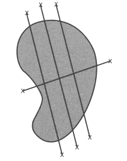
The first holes drilled will be the long center seams that run the length of the cover. Start with the centermost seam and drill the anchors on each end of the cover. Attach the springs to these anchors and check your centering, side to side and end to end. If it looks good, then drill the anchors on the seam that is on either side of the anchors just drilled.
Pull the cover horizontally, away from and against the anchor just drilled. Don't pull it so much that it pulls the strap next to you toward you, but just enough to be taut. After drilling the anchors on either side of the first anchor, and on both sides of the pool, connect the springs to these anchors and adjust the straps for a snug fit.
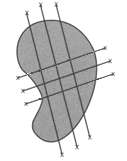
Now move to the side of the pool, and do the same thing, drill the centermost anchor (on both sides of the cover), then attach the springs. Then install the anchors on either side of the center seam, tugging the cover snug, away from the center seam, so you won't have any gaps or wrinkles on the cover edge.
The cover seams should be running perfectly straight, and not pulling in one direction, where the seams cross. If your seams are running crooked, adjust your strap tension, and recheck your centering.
Work your way from the center, outwardly, pulling any slack toward the outside as you go, alternating from side to end and back to the sides. Keep checking your center as you go and keep the seams running straight.
STEP 1: Raise the water level to the top of the tiles, to help support the cover. Remove ladders and other obstructions. Lay the cover over pool and adjust for equal overlap on all sides. Use buckets full of water or water tubes to anchor the cover around the edge in four to eight areas. Another strategy for centering the cover is to use eight ropes attached to 16 stakes, running across the pool, and laying the cover on top of the tightly pulled ropes. In any case, pull cover tightly to remove packing wrinkles and help cover to lay flat, with equal overlap and few edge wrinkles. Install all of the cover springs onto the straps with equal adjustment.
STEP 2: Drill the first holes 3-6 inches behind the two straps that run the length of the pool. Move to the other end of the pool and drill the anchors opposite, on the same seam, also 3-6 inches behind where the spring ends. When all four anchors are tamped into place, connect all four springs using the installation rod. Adjust tension to equalize overlap and tension on the springs.
STEP 3: Now move to the side of the pool and find the two centermost seams running across the cover. Drill holes 3-6 inches behind the end of the springs on the centermost seams, and then move to the opposite side and drill the two anchors on the other side. Tamp in the anchors and attach all four springs. Adjust tension to equalize overlap and tension on the springs.
STEP 4: Now move back to the end of the pool and drill the holes for the two straps on either side of the first two holes you have drilled. Again, wait until you have drilled all four anchors, on both sides of the pool, before you connect the springs to the anchors.
STEP 5: Move back to the sides of the pool and drill the two holes on either side of the holes drilled before. Continue in this way, working from the inside out, until you complete drilling all of the anchors. Adjust the cover straps after each set of straps are connected, for equal overlap, equal tension and straight running seams.
Here's another video of Rob installing a custom or freeform safety pool cover.
INSTALLING A RECTANGULAR POOL SAFETY COVER
For rectangular pools or nearly rectangle pool shapes, you will start by installing the corner anchors first. With the cover centered properly over the pool, drill your first corner anchor holes with your rotary hammer drill.
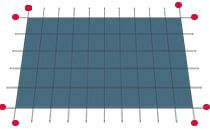
When drilling the corner holes, measure to be sure that all of the holes are the same distance back from the pool's inside edge or the back edge of the coping. You can also snap a chalk line, after the corner anchors have been set.
Skew the straps slightly toward the outside, so that the straps, when attached to the anchors are pulling slightly away from the pool, just by an inch.
In other words, the two straps on the same corner should be drawn in toward each other, one inch on either side, which means your anchor placement will be skewed outward by one inch.
After your corner anchors are all tamped into the concrete, connect the appropriate straps to the raised anchors. Adjust the tension on the straps so that the springs are compressed at least one-third of the way. Double check your centering before continuing. If it's not quite equal, loosen one side's straps and tighten up the straps on the opposite side.
Now you can snap a chalk line in between corner anchors and place the remaining anchors on the chalk line, directly behind the cover strap. Or, use your measuring tape and measure the same distance, drilling a hole directly behind the cover strap.
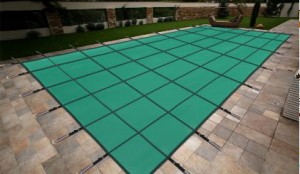
STEP 1: Remove ladders and other obstructions. It's easier to "float" the safety cover on the water surface if water level is normal or higher. Measure the cover and the pool. Lay the safety cover over pool and adjust for equal overlap at all four corners of the pool. Example: a 20-foot by 40-foot rectangular pool takes a 22-foot by 42-foot cover. Overlap on each side may vary 11 inches to 14 inches. Pull cover tightly to remove packing wrinkles and help cover to float on pool surface. Install springs onto straps with equal adjustment. Center the cover perfectly over the pool. Measure to be sure.
STEP 2: To determine anchor points for the two anchors at each corner of the pool, measure 18 inches back from the outside edge of the cover corners (NOT the edge of the pool). Measure at right angles (90 degrees) to the safety covers' edge. Placing the anchor inward a bit more is a good idea. I usually "skew" the straps somewhat in corners so that the anchor is drilled at approximately 120 degrees from covers' edge (the edge perpendicular to the strap).
STEP 3: Install the eight anchors at the four corners of the pool by drilling into the concrete with a 3/4-inch masonry bit in a rotary hammer drill. Drill 2-3 inches deep, then hose away the dust with water. Using the tamping tool, hammer the brass anchor into the hole, until it is flush with the concrete surface.
STEP 4: After ALL eight corner anchors are installed, attach springs to anchors using installation rod. Re-check to insure equal overlap; adjust strap length on one side or end if cover needs to be shifted to center it over the pool equally. Adjust tension on straps so that springs are one-third to two-thirds compressed.
STEP 5: Install the remaining cover anchors, adjust tension as needed to re-center and/or tighten the cover. If you have a chalk line, it's easy to snap a line between corner anchors and use this as a guide for placement of the rest, or just measure 18 inches straight back from the covers' edge, at every strap/spring.
Should I Winterize the Pool Before the Cover is Installed?
I usually winterize the pool after I install a safety cover or I start lowering the water once I get the cover about one-third installed. Then I just pull open the cover to access the skimmer and returns for plugging. Just be sure to clean the pool thoroughly before installing the cover.
It is easier to install the safety cover when the water level is higher in the pool, so that the cover is floating on the surface as you spread it across the pool. This is especially more helpful for freeform cover installations, as it will help you to more easily center the cover on the pool.
What Could Go Wrong?!
Not Centering the Cover Repeatedly. This results in gaps where the edge bunches up or areas with too little coverage, or too much coverage, or cutouts not lining up. In most cases, it comes down to properly centering and aligning the cover, before you start drilling. And before you drill the next hole, walk around and look carefully for skewing or stretching, which can affect the placement of the next anchors.
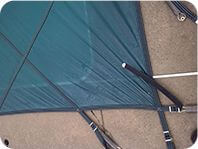
Not Adjusting the Straps Repeatedly. If you are installing your safety cover and the cover is starting to bunch up along the edge of the cover you should start by adjusting some of the straps on the cover by either loosening or tightening the strap. This might take you a little bit of time it is done by a trial and error process. Normally when you adjust the straps this will remove the pucker you have in the material. Also make sure the strap is not twisted or upside down when it is installed onto the anchor this can cause the material to gap around the cover.
If you run into an area with too much safety cover material you can try to have extra overlap on the opposite side of the cover to offset the extra cover material. If you have too little material then you need to go back and make sure the cover was installed correctly. Try to always center the cover over the pool, for equal overlap on all sides. And take your time!
Not Paying Attention to Cutout Locations. If you have a safety cover with obstructions and the cutouts don't line up in proper location go back and try to adjust straps so that you can move cover and hopefully this will make the cutouts line up in the proper location.
When installing a safety cover it is important not to rush take your time; measure twice and drill once. In regards to installing a freeform safety cover it is imperative that you drill anchors on both ends of a seam and attach each spring before continuing. After drilling anchor holes and the cover is in place go back and make necessary adjustments to the straps so that the seams run straight on the cover, and you keep the cover centered over the pool as you progress.
Not Using the Right Accessories. If you don't have a concrete patio follow the manufacturer's installation instructions for a wood deck or brick paver installation. In regard to a wood deck you should use the wood deck anchors for the most secure installation.
For a brick or paver deck you should also use aluminum tubes for the most secure installation of your install safety cover. The brass anchor is press fitted into the paver tube and then the paver tube is pounded down into the hole that you drilled so that it is flush with the top of the brick or paver. This gives you the most strength and stability for heavy weight on a safety cover.
In both cases, however, you could use just concrete anchors in a wood deck, but as the wood ages, the anchor may loosen in the hole. Likewise, you could just a regular concrete anchor on brick or paver decks, drilling the hole between or behind two or three pavers, but any movement in the bricks could cause the anchor to loosen up over time.
Give us a call with any questions you may have on pool safety covers. I installed my own, and you can too!