FREE Standard Shipping On All Orders $100 or More!*
Priming a Pool Pump

I can hear those pool pumps starting up all over America! Some of those pumps sound like they're not catching prime, however. After a long winter of water evacuated pipes, it can take some finesse to bleed the air out of the pipes and system, and get the pump to "catch prime", or operate at full pressure and water volume.
For pumps that sit above the pool water level, which is most inground pool pumps, overcoming the vertical lift while pulling the air out of the system can take some time. In some cases, you may need to fill the pump several times with water to get the system to catch.
And then, after the pump is started up on one skimmer, you have to "bleed-in" the other lines very slowly, pulling in the air, bubble by bubble.
Here's how it's done...
How to Bleed the Air from Pool Pipes and Prime the Pump
[embed]https://www.youtube.com/watch?v=4tlIP0qp2Ic[/embed]
PRIMING A POOL PUMP:
- Tighten drain plugs with thread sealant like Teflon tape, and lube pump lid o-ring with silicone lube.
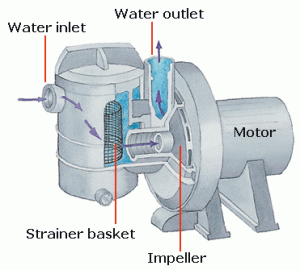
- Fill pump basket full of water until it spills over, from a bucket or garden hose.
- Tighten pump lid very firmly, and open the nearest skimmer valve.
- Place a filter multiport valve on recirculate or waste positions for less resistance.
- Open air bleeder on top of filter, and turn on pump.
- If pump does not catch in 30-90 seconds, repeat steps 2-5.
BLEEDING THE AIR OUT OF THE LINES:
- After starting the pump on one skimmer, slowly open other skimmer valve to draw air trapped in the pipes into the pump.
- When skimmer(s) are pulling, slowly open up the main drain valve to pull in the air.
Very Slowly, (see video or transcript) - it can take a few minutes per line, so get a comfortable seat on a bucket while you remove the air from the pipes, by slowly drawing it in - bubble by bubble!
Video Transcript:
Hi this is Rob - today we are priming an inground pool pump, by slowly bleeding in the air that's trapped in the lines, after a long winter's ... winterization.
Right now our pump is running on the shallow skimmer only, and it makes sense to start the system only on one line. So, of our four incoming lines, skimmer, skimmer, main drain and spa drain, we only have the skimmer valve open. The pump is drawing water, as we can see in the pump basket, and in our check valve with the clear lid, we can see the water moving. And now we want to open up the other skimmer, then the main drain and then the spa.
The trick is to open up the valve very slowly, to introduce the air, one air bubble at a time. Here it comes, it's managing it, but if it starts to bog down too much here, then I will close the valve again, but it's slowly introducing the air. Oops, that's a little too much, so I'm closing the skimmer valve again - but now it's popped up again, so now I'm slowly opening the skimmer valve, just by millimeters, I'm just turning this valve by millimeters - to slowly introduce the air that is trapped in the skimmer pipe. Sort of an Open-it, Close-it, Open-it, Close-it, and little by little, we suck out all the air that's trapped in the pipe, until you have only water coming through. And now we have both pipes open - the pump's a lot quieter now.
And next we'll do the main drain, introducing the air in the main drain line. Slowly, millimeter by millimeter... here comes the air. Slowly...looking good! If you just open up all the valves at once, it's too much air for the pump to overcome. That's why we always, when trying to start up a pump in spring, start it off of the nearest skimmer, and then slowly open up the other valves, until all the air is drawn in, one pipe at a time. Oops! a little too much. OK, I closed the valve again because it sucked in too much air. Slowly opening the valve again...And while it's doing this, I open the air bleeder periodically, to release some of the trapped air inside of the filter tank. We're almost there with the main drain. Yep, here it comes. Now the main drain is pulling fully.
The only thing left is our spa drain over here, which has an automatic actuator on the valve to turn it automatically. I could remove the actuator and turn it manually, by removing these 4 screws, but I'll just flip the little switch here, for just a second, and then back to center. Down again another half second and then back to center. Another half second...there's a little toggle switch I'm using here to operate the valve, and open it just a millimeter or two at a time, and there we go. That one was easy because the spa is located close to the level of the pump, and there's not a lot of air trapped in there.
And that is how we bleed in the air from an inground pool pump!