FREE Standard Shipping On All Orders $100 or More!*
Installing an Expandable Pool Liner

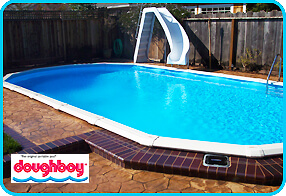
Doughboy® Pools have a long and rich history in America. They are one of the only aboveground pools with a deep end section. They are also the only aboveground pool to use an Expandable pool liner.
Expandable pool liners stretch into shape as you fill the pool, by slowly releasing the vinyl liner as the pool fills with water. Other liners are fully lining the walls and floor before filling begins.
Doughboy® sells their own expandable pool liners, or you can buy replacement expandable liners made by GLI, Swimline or Lomart.
In The Swim expandable pool liners are available in 11 stock sizes, for Doughboy® pools with a 60" or 72" deep dished out area, at prices from $159 to $429, depending on size, depth and pattern.
Do you have a Doughboy® Pool?
- Straight wall sections have a slight curve in the panel.
- 2-3' safety ledge is installed around a 5-6' deep area.
- Deep area is a rounded bowl, not a hopper bottom.
How to Install an Expandable Pool Liner
Tools: Set of 18-24 rubber tipped clamps, soft push broom, rounded end trowel, good set of screwdrivers, razor knife.
Materials: Expandable pool liner ordered to fit pool inside dimensions and depth, new skimmer and return faceplates and gaskets.
STEP ONE: DRAIN THE POOL, REMOVE THE LINER
Most Doughboy® pools don't have a main drain, so draining completely will require the use of a pump, either a pool side, or a submersible pump.
Once the pump shuts off or starts sucking air, carefully walk down to the deep end, and with a razor knife, cut the liner around the base of the wall, all around the pool. Two people pull the liner up to drain the last bits of water to the pump. Remove the pump, and remove the liner from the floor of the pool.
Working around the pool, remove sections of the top rail and coping strips to remove the liner as it goes over the wall. Replace the top rail sections, but not the coping strips.
STEP TWO: WALL & FLOOR PREP
Now that you can see the wall, broom it clean of any dust or deposits. If rust is visible, scrape off and paint over, and consider using wall foam. Also decide if you can reuse the wall cove, between the wall and floor, or if you should replace the pool cove.

Next step is to prep the floor with brooms and trowels to smooth out the sand, reshaping areas or adding masonry sand if necessary. Remove any pebbles or wind blown debris, and use tools to lower high spots and fill low spots. Start in the deep end and work your way out of the shallow end, creating sharp transitions on the safety ledge and shallow slope.
STEP THREE: INSTALL THE LINER
Here's where things get different - up to this point, it's been the same as any other pool liner job, but for an expandable liner, the next step is very unique.
Unbox the liner in a clean grassy area, unfold it and mark the seam intersections with duct tape. This will be helpful to make sure the liner is not 'askew' in relation to the round or oval pool shape.
Refold the liner, accordion-style, or fan-fold it starting at the shallow end. With 4 people, carry the liner and place it on the top of the shallow end top rail. Using clamps and all 4 people, carefully pull the liner over the pool, pulling it over the top rails and gently clamping it to the rail.
After some adjustment to center the liner around the pool, using your duct tape marks as reference - adjust the slack of the pool liner, so that the wall-to-floor seam is 4-6" from the top of the pool wall, then reclamp the liner to the top rail all around the pool.
STEP FOUR: FILL THE POOL, LET OUT THE LINER
The last step to installing an expandable liner is the one that requires close attention. Begin to fill the pool with water, and allow the liner to become taught and stretch.

For every 1/10 of water added, release the liner 1/10 of the way. This is done gradually, releasing several clamps, allowing the liner to slip a few inches into the pool, and reclamping the liner to the top rail. If wrinkles appear, reach over the wall and pull the liner towards the wall.Filling from a truck, although costly, will make this step last only 1-2 hours. If filling from a hose, you'll need to let out the liner a few inches, every few hours until completely full, which can take 24-48 hours.
When the expandable liner has completely stretched into place, there should be just a few inches of liner left on the outside of the walls. Remove the top rail sections, place the coping strips over the liner to secure it to the wall, and trim off excess vinyl material on the outside of the wall.
Last step is to screw on the skimmer and return faceplates (tightly), and cut out the vinyl inside the faceplate, to flood the filter system and plumbing.
~ Congratulations! You've just installed your own expandable pool liner. There may be a few wrinkles, that's considered normal with this type of pool, but if you are patient and allow the liner to stretch, wrinkles will be minimal.
BONUS TIPS:
- Don't use an expandable liner on a pool not meant to use one - the walls may collapse inward during filling!
- If filling from a hose, measure your GPM flow rate by timing the filling of a 5 gallon bucket, so that you can time when to release more liner.
Balance the pool water and begin filtering and sanitizing and you're ready for the first swim in your newly lined Doughboy® pool!