10% Off Sitewide Sale + Free Shipping No Minimum*
Installing a Replacement Pool Filter
Replacing a pool filter can seem like a daunting task. Not only is your current one no longer functional, but there are so many pool filter options out there that it makes your head spin – different sizes, types, models, medias, and brands. When all hope seems lost and you’re about ready to give up, you remember the world’s most important acronym: KISS.
Unless you have done your research and have decided that you indeed want to switch the type of filter you’ve been using, the best pool filter to get would be a new version of what you previously had. Replace your pool filter with the same make/model if you want to make it easy. Doing so can help you avoid major (or even minimal) plumbing changes along with having to learn how to maintain a new type of pool filter.
That being said, sometimes a certain type of filter may not satisfy your expectations for filtration or ease of use. Bigger filters are generally considered better (not so for pool pumps), and this may be a good time to upsize your pool filter or perhaps switch to a different type of pool filter. Let’s discuss the different types of replacement pool filters:
Pool Filter Types
Sand pool filters are the oldest and most popular type of pool filter. They use a special sand media that filters from 20-40 microns in particle size. This sand will last 5-7 years before needing to be replaced. Sand filters require backwashing every few weeks to churn the sand and flush out the trapped dirt. Pros: Low maintenance, easy to understand. Cons: May not trap fine, silty dirt or dust very well.
Cartridge filters can filter particles ranging from 10 to 20 microns and they do so by screening them at the surface of the cartridge element. A pleated filter of Reemay (spun polyester) that looks similar to the air filter in your car, filter cartridges will need replacement every 2-5 years, depending on how they are sized and used. When a filter cartridge gets too dirty to allow normal water flow, they are not backwashed, but the cartridges are removed from the tank and manually hosed clean. Pros: Better filtering ability, saves water. Cons: Cartridge replacement, cartridge cleaning.
DE or Diatomaceous Earth filters are considered by many pool owners and professionals to be the best pool filter type since they are able to filter out particles as small as 3 microns. DE is an organic, porous powder with microscopic pores that trap these very small particles. DE filter grids, which hold the powder may develop holes over time. The lifespan is usually 7-10 years.
Like sand filters, DE filters also require backwashing to flush out the old dirt and DE powder. Regenerative types of DE pool filters come with a bump handle that, when used, mixes and repositions the dirt and the DE powder to resume normal water flow. The ability to bump these types of filters (Hayward Perflex) enables you to maximize the filtering power of the DE powder and make it last longer between backwashes. This in turn helps you save on wasted water and the chemicals used to treat it. Pros: Best filtering ability, long element life. Cons: Most expensive pool filter type, manual grid cleaning every 6 months is recommended.
Sizing a Replacement Pool Filter
When it comes to sizing a replacement pool filter you never want to get a filter that is rated for pools smaller than your own. The size of the new pool filter you need directly corresponds to the size of your pool and the power of your pump. While oversizing your new pool filter will allow for finer filtration since the water is flowing at a slower velocity, this will also mean that backwashing will not be as effective, so it is recommended that you follow the suggested filter sizing.
If you are looking to buy a pump along with the replacement pool filter, getting the correct size (or power) of pump is extremely important. Many times you can buy a filter and a pump in a package together, but if this isn’t the case, remember that we are trying to keep it simple. The pump you want to buy is going to be the same size that you previously had. Unless you have come to find that the size of your previous pump was incorrect, going with a pump that’s got more power than your previous one will not only result in loss of electrical and filtration efficiency but can also damage your equipment or piping.
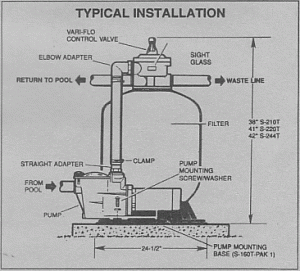
Pool Filter Installation Guide
Materials:
- Tape measure
- Fine-toothed hand saw
- Sandpaper or emery cloth
- PVC piping and PVC elbows
- PVC adapters and couplings
- PVC cement and primer
- Teflon tape
Now that you’ve gotten your new filter and have gathered the installation materials, it’s time to take you through the easy steps of installing a pool filter. Since each filter type has a different setup, I’ll let you follow the specific steps that are supplied with your new filter owner's manual, and instead jump ahead to the piping and physical installation of the pool filter.
The steps to pool filter replacement
- Turn off the power to your pool pump.
- Close off the valves leading in and out of your pool filter.
- Unscrew your filter’s drain cap and drain the water inside.
- Cut or unclamp the pipes coming in and out of the old filter. Choose the best cut location to allow for easy reconnection to the replacement pool filter. Remove the old filter.
- Assemble the new filter (follow the steps in your filter’s manual).
- Place the new filter into position.
- Use Teflon tape to help seal any threaded PVC connections.
- If installing an exact-match filter, your plumbing is ready to go – just install the adapters and/or couplings and you’re done!
- Dry fit all fittings first as a test to make sure everything will connect fully.
- Apply PVC primer on the outside edges of the pipes (2 inches), and the inside of PVC pipe fittings to clean and soften the PVC before applying PVC glue.
Once all the piping is set and the cement is dry, test the system. If you are leak and drip free, then you're all done!
Note the startup pressure gauge reading on your new filter. You should plan to clean the filter or backwash when the pressure gauge is reading 8-10 pounds over the clean, startup pressure.
Your new pool filter is now successfully set up, installed, piped, and sealed. You are ready to start filtering your pool! Make sure you set up a schedule for regular maintenance checks so that you can keep your filter system operating at peak efficiency for many years to come!
Happy filtering!