10% Off Sitewide Sale + Free Shipping No Minimum*
How to Build a Pool: Pouring the Concrete Collar
Inground vinyl pools, no matter what type - steel or polymer, need a concrete collar around the outside of the pool at the bottom of the walls for support. This way, the pool walls sit on a flat and heavy "shelf" all around the pool. This shelf is usually 2.5' wide from front to back to allow for the A-frame bracing attached to the wall panels.
The concrete collar fills that 2.5' overdig space, all around the pool with concrete, that is your collar, or think of it as your pool foundation. It locks in the walls and bracing to the ground so there is no movement or shifting of the pool wall panels at all. If the shelf or trench around your pool is greater than 2.5 feet wide, then you can create a mound of dirt to stop the concrete from going out any farther than that.
The type of concrete to use for this is the cheapest concrete your local company has as you are just using it for support and it will be covered over with backfill material. The mix to get is usually called a 2500 mix which has more stone in it than a finish concrete.
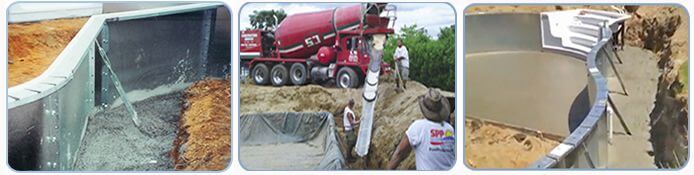
Mixing your own concrete is an option but a lot of work and not much in savings either. The easiest way to do this is to order concrete to be delivered to the pool site, have 2 or 3 of your friends or strong helpers to pull the concrete around the pool as the cement truck shoots the concrete into the trench.

There is no need to do anything but pour and make sure it is up against the walls and all the way back past the end of the A-frame brace and at least 10" to 12" deep. No need to trowel or finish the concrete and no worries if a little rain is expected.
If a significant rain fall is coming then by all means cover what you can with tarps. The weather is not really a factor in this step off the installation, curing may take a little longer in cold or wet weather but that is not a problem as long as before you start filling the pool with water the concrete is cured.
Ordering the Concrete
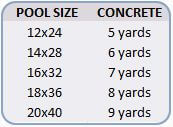
Order your concrete by phone, several days in advance of needing it. You'll choose a time of day and let them know how much, and what type of concrete you want. When ordering the concrete you can tell them the size of the pool and the depth of the concrete you are looking for and they can tell you how much concrete you will need. It's usually a 2-1/2 ft wide trench, 10-12 inches deep, for the length and width of your pool, plus 5 feet.
You may want to measure before ordering, to be sure of the distance from the pool walls to the dirt walls. Areas where the dirt caved in, or was overdug, or the ramp into the shallow end can be filled in with a foot high mound of dirt, to keep the concrete a consistent depth and width around the pool walls.
Pouring the Concrete
Line up 2 or 3 people in a row with 4' or 5' between each, straddling the pool walls and the dirt walls, and pulling the concrete right through their legs. This is usually the easiest way to move the concrete down the trench. Shovels and garden rakes are used to move the heavy mix. Having the concrete a little on the wet side makes for an easier pour also as it flows better around the pool.
The normal collar as I have said is poured 10" to 12" deep and that's really all that is needed. If you have extra in the truck by all means use it to make it deeper, but not too deep as it may bow in the walls if there is too much pressure pushing against the walls. Leftover concrete can be used for an equipment pad, or other pre-planned use.
You can get the truck within about 5-6 ft of the trench, but not too close, as you do not want the truck to collapse the ground around the trench. The more places the truck can get to around the pool the easier and quicker the pour will be. If you can get the truck to at least two opposite sides of the pool, it will go quicker, with less effort. They have about 10-12 ft of chute on the truck, usually.
On some job sites, a few wheelbarrows may be needed to carry concrete to the pool if the truck can't get closer to the pool. This may increase the delivery charge, as many give you a set number of minutes to unload, and extra time is charged, by the minute. All companies are different in their time allowed on the job before extra costs are charged, so ask when you order your concrete.

Once the collar is poured make sure you go around and check that all the walls are straight, that they are plumb from top to bottom and that they are still level. Once the concrete is dry none of this can be adjusted other than the turnbuckle on the brace for the wall adjusting about an inch or so in or out, so a little checking right after the pour is a great idea.
Pouring the concrete collar, just another one of the steps involved in building your own pool. When you select ITS as your inground pool kit provider, you're getting more than 4 skids delivered to your house. Our team of experts at ITS are available to you 6 days per week, by phone or email. We've seen it all, and can help you plan your DIY pool installation and walk you through any unexpected problems you may encounter.