FREE Standard Shipping On All Orders $100 or More!*
Replacing a Pool Pump Pipe Fitting

My friend whose pool has been featured on this blog several times has again suffered pool problems, which makes for another unique teaching opportunity.
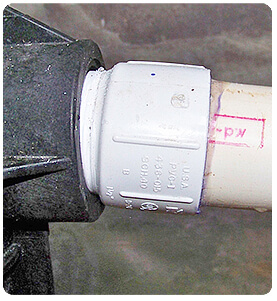
This time it's the pipe that goes into the pump, it has shrunken from heat. He admitted to accidentally leaving incoming valves closed (skimmer/main drain) after cleaning the pump basket, and it seems that the pump ran all night without any water running through it to keep it cool.
"A very common problem", I told him. The heat from running the pump "dry", or without water running through it, causes the PVC MTA (male threaded adapter) to melt, or shrink actually - which allows air to suck in around the threads. This can happen when the pump loses it's "prime", as a result of low water level, stuck skimmer weirs, a loose pump lid or as in this case, closed suction valves.
How to Fix a Shrunken Pump Fitting
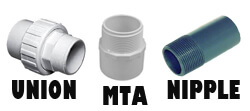
"There's two ways to fix this", I told him. The quick fix is to mix up equal parts of Pool Putty and stuff it into the area where the fitting is screwed into the pump. The better, more permanent way, is to replace the fitting, by cutting it out, threading in a new MTA, nipple or union, and gluing it on to the PVC pipe.
Pool Putty Repair: I must have done this repair about a thousand times, to get the pump up an running again. In some cases a putty repair can last for many years, but most times it will crack again if situations repeat, or even just with outside temperature swings, but it's always good for at least a few months, if not a few years.
To make a pool putty repair, use a saw or razor knife to cut off equal portions of Resin and Hardener. Mix the two in your hands, using a little water to make it easier. Fold it and mash it and mix it well for about 30 seconds or until the color is uniform. Then roll it into a "snake" between your hands, about 8" long and 1/2" thick. Wrap the threads of the MTA with your pool putty snake, right at the point where the threads enter the pump. Push it in deeply so it's half covering the MTA and half covering the edge of the pump opening. Use some water to help smooth it while you push it into the crack - into the areas around the fitting where the air was getting into the pump.
Here's the important thing - leave the pump running for 24 hours, and don't shut it off until the putty hardens. If you do shut off the pump before the putty hardens, a back pressure will spray water out, and open up an air leak again. Be prepared to leave the pump running for 24 hours - to let the putty harden in place.

Pump Pipe PVC Repair: The better way to fix the issue is to replace the shrunken fitting with new. It's more involved than stuffing some putty around the fitting, but is the most permanent repair that you can make. Before you break out the hacksaw, make a solid plan for the repair. For materials, you'll need to buy a new MTA fitting, or a Nipple threaded on one end, or a union fitting that is threaded on one end. For supplies, you will need thread sealant such as Teflon tape and Blue RTV gasket material or a silicone sealant. You'll also need (fresh) PVC glue and PVC primer/cleaner.
Space is often a problem; there may not be enough room to cut the pipe and reconnect the pipe, before you encounter a previous repair coupling or a valve, or something you can't connect to easily. To circumvent this, you may need to do more plumbing than necessary, to slide the pump back a few inches, to provide space for the repair. In other cases you can sometimes chip off old couplings from around a pipe or valve, by using a using a hacksaw blade to get it started by cutting through the pipe or coupling, and then flathead screwdriver and a hammer, to wedge into the glue joint, and pry off the layer of PVC. This slow method also works to chip out a pipe that is glued inside of a valve or fitting. Take your time and work slowly, trying not to gouge surfaces that you will be gluing later.
Rarely do the valves need to be sacrificed, but if they are very old and leaky, replacing the entire suction manifold from the ground-up could be in order. If you have space to move the pump backwards, that would be an easier solution than replacing the incoming valves. Slide the pump back by extending the pipe that comes out of the top of the pump. Another way around the issue of limited space on the pipe in front of the pump is to cut a regular sized coupling down by sawing off 1/2" on each side. Rubber couplings can be used, but are prone to leak and collapse when placed so close to the pump intake. Using a nipple (a pipe that is threaded on one or both ends), instead of an MTA fitting can be useful, and can save about 1/2" of space. Installing a union instead of a coupling can also be done, and if the repair needs to be redone in the future, you can just replace the union-half that's on the pump side, and be back in business in minutes.

When space is not an issue, the normal repair process looks like this - use a saw to cut the pipe, leaving 1-2" of clear pipe to reconnect to. Unthread the fitting from the pump by hand, or using large channel type pliers. Thread in a new MTA fitting into the pump, after smearing a silicone sealant over the threads and then wrapping it 3 times with Teflon tape, over top of the 'schmear' of silicone. Cover all of the threads and be sure to wrap the tape around the threads in a Clockwise direction - if not, it can unravel as you thread in the fitting.
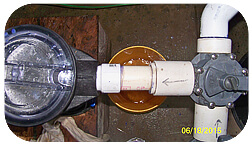
Tighten the new MTA fitting into the pump by hand and then use channel type pliers to turn it another 1-1/2 turns. Don't overtighten it, but do make sure it is very tight. Now you can cut a piece of PVC pipe to the right length, and glue it into the MTA fitting, so that it comes within an inch of the incoming suction pipe. Now use a PVC coupling or union to connect the two pieces of pipe together. You may need to bend and push on some of the pipes if you can't slide the pump, to get the coupler in between the two pipes. All of these plumbing items I speak of can be bought at Home Depot or Lowes, or smaller hardware stores or plumbing suppliers. 99% of pool pumps use either 1.5" or 2" pipe and connectors, a size that is fairly easy to find. We also sell a few pool plumbing fittings in our online store. If you're unsure what pipe size you have, note that 1.5" Schedule 40 PVC pipe has an outer diameter of 1-7/8", and an inner diameter of 1-1/2".
Use PVC cleaner or primer just before gluing, it softens the pipe and fittings to make a better bond. Use lots of PVC glue on both pipe and fittings, and push them together within about 15 seconds of applying the glue. Push pipes into fittings with a twisting motion, and then hold it firmly for about 15 seconds.
Final Thoughts? Protect your hard work by taking steps to prevent it from happening again, whatever it was that caused the pump to run dry. Oh, and one more thing. In my friend's case, the impeller or shaft seal were not damaged, but in some cases of very high heat, the impeller and/or the shaft seal can become damaged from running the pump dry. In extreme cases, of high heat for long periods of time, the motor can overheat and fail. But - in many cases, after making a putty or pvc repair, your impeller will pump water like it always has, and the shaft seal won't be leaking when you fill the pump up again.