FREE Standard Shipping On All Orders $100 or More!*
Leaking Pool: Find and Fix Pool Leaks
Pool leaks can be aggravating, especially when you don't see any leakage, and don't know where to start. This post, originally from 2018 - is all new for 2020!
How do you know if your pool is leaking? On a hot day, evaporation from a swimming pool can account for 1/4" of pool water per day, and a good backwashing may use up to an inch of pool water. And maybe your backwash line is leaking water or a loose plumbing fitting on the pump has a steady stream?
Splashout may be a noticeable amount, if you have a lot of pool activity, but not normally. After accounting for these unavoidable leaks, if you still think your pool is leaking - read on, my friend.
Is your Pool Leaking?
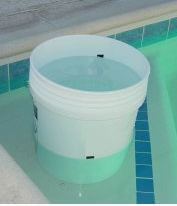
To remove evaporation from the equation, you can perform a Bucket Test on your pool. Place a 5 gallon bucket on the first step of your pool, in a swimout, or on the top step of your ladder. Fill the bucket half-full of water and mark the water level with a piece of electrical tape (or use a permanent marker) on the inside of the bucket. With a second piece of electrical tape, mark the pool water level on the outside of the bucket. Avoid backwashing and splashout for 24 hours, and compare the two marked measurements.
The water lost from the bucket will only be evaporation, but the water lost from the pool is evaporation, plus (?) any other water loss. If there is a noticeable difference between the two, you can begin to locate the leak in your pool.
How to Find Leaks in your Pool
Leak detection in swimming pools is a step-by-step process of elimination among 4 main areas; the Pool Shell, Pool Lights, Pool Plumbing and the Pool Equipment. Let's dive right in, shall we?
To find a pool leak, the first place to inspect is around your filter and pump. Do you notice any water spots or damp areas there? If so, try to trace back where the water is coming from. Very often, it will be a connection on one of the pipes in this particular area. You may need to turn on the pump for a while and observe it to see if any leaks develop while everything is running. However, a small drip on the pump or filter will not amount to much, and is likely not noticeable in the pool level.
In order to determine whether or not the leak in the pool is in the plumbing or in the shell of the pool, you would isolate the plumbing. This means to plug all the holes in the pool. Plug the skimmer and the return fittings, cleaner fittings, vacuum lines, main drain (if possible) with expandable freeze plugs or threaded plugs.
If no obvious leaks can be found in the plumbing, then perhaps the leak is in the shell of the pool itself. If your pool is gunite, your plaster whitecoat is the water proof layer over top of concrete. Much tougher than a vinyl liner.
Leaks in your Pool Shell
Vinyl pools have the most vulnerabilities in this area, with the potential for small tears in the vinyl, seam separations, or leaking around the cuts that were purposely made for the light, steps, skimmer, drains and wall returns.
Concrete pools can leak through a crack in the shell, most commonly in the tile line, or through small voids surrounding pipes that come through the wall, or the very common skimmer leak, at the interface of the plastic skimmer and concrete pool wall.
Fiberglass pools can also leak through a crack in the shell like a concrete pool, or leaks in the skimmer, return, drain or light faceplates.
To find or to rule out leaks in the pool shell, plug all of the plumbing lines - skimmer, main drain, returns. You can use rubber or threaded plugs - the kind used for winterizing. Shut the pump off at the breaker, so it won't turn on while the lines are plugged. You may also want to shock the pool beforehand, as you might need to keep the pump off for a few days, if it keeps dropping. Raise the water level to the normal level before beginning this test, to prevent confusion - when the water has already stabilized at the lowest level.
Many times, if the leak is large enough, it will quickly drop to, and stabilize at the problem area. This may be right at the bottom of the skimmer, or just beneath the returns or at the pool light. If pool water level continues to drop with all of the lines plugged, you can rule out the underground plumbing (your worst fear). If however, the leak stops when you plug the pipes and shut off the pump, jump ahead to plumbing and equipment pool leaks.
When it seems that the water level has stabilized (remember that evaporation will continue unless you cover the pool completely with a solar blanket, and you will need to subtract any rainfall amounts), you can begin to inspect the waterline area closely.

When your pool shell or vinyl liner has a leak, usually you will find small bits of debris that have been sucked into the crack or rip in vinyl. To confirm a leak in a suspected area, use food coloring or a dye syringe to dye test the area.
Dye testing is done with the pump off, to reduce currents. Squirt a small amount of pool test dye near the area to see if it moves towards and gets sucked out of a hole. Wear a mask or goggles to see the action clearly.
Leaks in the Pool Skimmer
One of the most common areas for leaks on an in-ground pool, leaks can occur inside the skimmer body, or on the sidewalls of the skimmer, usually from winter freeze damage or excessive ground movement. Aboveground pool skimmers are often replaced entirely when leaking occurs, due to their low cost.
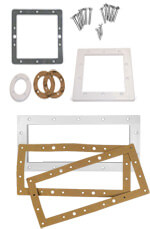
On vinyl liner pools, the faceplate and gasket are always the first suspects and can be dye tested, as described above. Rust on the skimmer faceplate or vinyl liner can be a sign of a leak, causing rust to form on the pool walls, which can damage the liner and walls.
If the wall area around the skimmer is rotted or rusted through you can use JB Weld to resurface a rusted wall, or you can use sheet metal to reinforce the area. Glue it and screw it, and then tape the edges with duct tape.
Sometimes a vinyl pool skimmer leak is just a loose faceplate, check that all screws are [very] tight. Install vinyl pool faceplates very tightly, using a #3 Phillips head until it squeaks and creaks!
Vinyl pool wall and floor fittings all have two gaskets, one under the liner and one above the liner. Replacing both faceplate gaskets is important, and be sure to use only OEM factory stainless steel faceplate screws if you need replacements. Other screws may not tighten properly and can rust.

On concrete pools, look inside the skimmer, to the point where the pool tile meets the front of the plastic skimmer. Inspect for cracks and debris stuck in the cracks. Dye testing will confirm the leak, often found on one or more of the three sides shown in the picture, directly where the concrete pool meets the plastic skimmer, which expand and contract at different rates, with fluctuating temperatures.
You can also use food coloring or your pH reagent for dye testing suspected leaks. If using a test reagent from your test kit, be sure not to suck in any water into the bottle, which will dilute the reagent and give false test results.
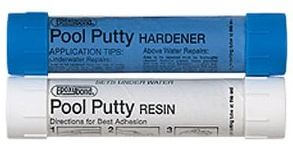
Cracks in the skimmer body (below the lid) can be repaired with an underwater epoxy mix, commonly sold as Pool Putty. This can also be used on the front 3 sides of the skimmer, where it mates with the concrete pool to fill in the voids and cracks.
To use Pool Putty, chip out all loose or cracked material, mix equal parts of resin and hardener with a bit of pool water until a uniform color. Then roll it into a 'snake', and push the putty in place. It can be used underwater or above water.

A second method for fixing inground concrete pool skimmer leaks is to pack in new plaster at the interface of the plastic skimmer and the concrete pool wall, or tile really. Chip out old loose plaster where the tile ends and the plastic begins, and pack in new pool plaster mix to seal it up again. Plaster mix is easy to work with, just add water and stir to a spreadable consistency and place with a putty knife or trowel. EZ Patch 1 can be applied above water or underwater, and pool plaster will cure underwater.
FIX-A LEAK: We sell a product called Fix-A-Leak, that is an emulsion added to pipes that seeks out and fills small cracks and voids. It does work, on SMALL cracks and voids, but in my opinion, it's better to find and fix the skimmer leak. Where skimmer leaks are concerned, it's best to make a solid repair, and not rely on a product that may not work, or may only work for a short time.
Leaks in the Pool Light
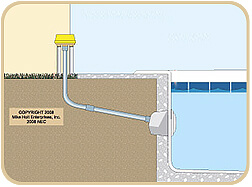
The conduit that carries the light cord from the light niche to the light junction box is not sealed, and can become cracked from shifting grounds or freeze damage.
If your pool water level has dropped down below the skimmer, below the returns and has stabilized at the top of the pool light, you probably have a leak in the pool light conduit behind the pool light.
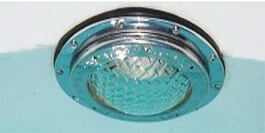
To repair, reach down and remove the screw at 12 o'clock and pull the light out of the light housing, aka light niche. Pull the pool light over the pool coping and onto the pool deck, or let it float in the water during inspection.
Conduit leaks are hard to dye test effectively, so when a pool light is leaking, the common repair is to seal up the opening where the light cord exits the niche and enters into the conduit.
There are 3 ways to seal up a leaking pool light conduit, and you can do it underwater, without draining the pool, but if the water level is already low, it could be easier:
- With a golf-ball sized chunk of mixed pool putty, create a mound around the cord as it enters the conduit. Push in and seal tightly against the cord. Allow to cure for 2 days with the light on deck before replacing the light. Can be done underwater with a mask.
- With a tube of 100% Silicone, squirt up into the light conduit and around the end of the conduit to seal up the exit for the water. After a good silicone plug is made, allow to dry for 2 days with the light on deck, before replacing the light into the niche.
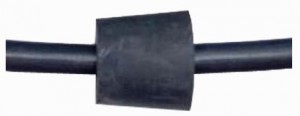 Use a product called a Light Cord Stopper. This is a split rubber plug that fits around the cord; push it into the conduit where it makes a fast seal. This method is preferred for the reason that if you need to replace the lamp down the road, you won't have to struggle with removing the putty, or silicone, which is especially difficult to remove from the conduit.
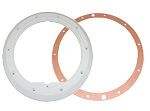
Vinyl pool lights have a dual gasket seal and an outer faceplate ring, and use two light ring gaskets, to sandwich the liner under the ring and two gaskets. Vinyl pool lights can leak out of the conduit as described above, but may also be leaking from a failed light ring gasket, or simply a loose light ring.
Other vinyl liner pool leaks can occur on the main drain gaskets, or step and swimout gaskets, and wall returns. You will need to lower the water to replace vinyl pool faceplate gaskets, or use the NEMO underwater drill, just for fun!
If you have a vinyl lined pool, small holes can leak a lot of water. They are usually not too hard to find however. To locate a leak in a vinyl liner pool:
- Turn off pump and dye test around skimmer plate, and all wall fittings, underwater lights and drop in step, seat or spa sections.
- Inspect closely the corners of the pool, especially where the liner fits tightly. Look for dark spots or leaf debris stuck to the liner.
- Inspect any ladders to make sure ladder bumpers are in place and the ladder has not cut a hole through the pool liner.
- Look for areas of the sand which appear to have washed away or eroded.
- Look for slight staining on the walls, which may indicate rust through.
When you find the leak in a vinyl liner, make a good repair. If you can lower the water to the point of repair you will get a better bond. Use a patch that is rounded, and is several times larger than the hole itself. Clean and dry the area if possible and apply light pressure for 1 minute after patching, then keep fussing with the edges to keep them from curling up.
Use Flexible Sealer to repair vinyl liner leaks. Or you can use a vinyl patch kit. The clear patch material is easy to work with, but these tend to yellow over time, so a matching piece of your own vinyl is better, if you are fortunate enough to have kept the pieces they cut out for the skimmer and the returns, or have a sample piece of your liner pattern.
Leaks in your Pool Plumbing
If your pool has not leaked since you plugged all of the plumbing lines, that could indicate a leak in the underground plumbing. The thought of this can conjure up images of a backhoe operator ripping up the pool deck, but it's never actually that messy, and many times the problem pipe is easily accessed. Indeed, underground plumbing leaks are rare, but they can occur from deep freeze damage or extremely strong shifting or expansive soils.

A process of elimination can also help determine which lines are leaking; Main Drain, Skimmer or Returns. Leave the plug in your main drain and remove the plugs in the skimmers and returns to start up the pump. If it continues to leak, you can unplug the main drain and replug the skimmers to check for skimmer leaks.
Pool return pipe leaks lose more water when the pump is running and pipes are under pressure; whereas a pool suction line leak will pull air into the pump while the pump is under a vacuum, and leak more water when the pump is off.

Pressure testing individual plumbing lines can be performed to determine which line is leaking. Then, the leak can be pinpointed further with more advanced detection tools, which "listen" for the leaking. A leak detection specialist will then literally draw an "X" on the deck or on the dirt, and tell you to "dig here". A 3'x3' deck section can be cut out, then the dirt removed to expose the pipe so that a repair can be made, and the deck replaced.
Don't worry, your worst fears will probably not come true. Many pool plumbing leaks are found directly beneath where the pipe enters the ground, at the 90 fitting, or can be reached by tunneling a few feet under the deck, or found under soft dirt, close to the equipment pad.
Leaks in your Pool Equipment
This one should be pretty obvious to you. In most cases, you will see water running out of your pump, filter, heater or chlorinator. Could be a quick fix or it could require some equipment repair or replacement.

One thing it won't be is equipment that is slowly drip-drip-dripping. Small drips on the equipment pad are not noticeable in the pool water level, and amount to a very small amount of water loss. Even if you have a fast drip, or several drips - it's likely less than 50 gallons per day, or under 1/8" of water level in the average pool.
A leaking filter valve, on DE and sand filters, can go without notice if a backwash hose is constantly connected to the waste port. At some point, the spider gasket in a multiport valve will fail, and after backwashing, water will continue to stream slowly out of the waste port and out of the backwash hose. The same problem can occur if you have a push-pull type of slide valve. Missing plunger o-rings will allow water to constantly flow out of the backwash line.
Plugging the backwash line can stop the flow of water while you order the parts for the repair, but don't make this a permanent solution. Oh, and installing a slice valve on the waste line? Not a repair I'd be proud of; better to get inside the valve and fix the gasket / o-ring problem.
In most cases, leaking pools are fixed easily. Don't keep yourself up at night with worst case scenarios, start with the bucket test and proceed through these stages to find your pool leak. If it does turn into an underground plumbing problem, you may need to contact a leak detection expert to help pinpoint the leak - but most pool leaks are not found in the plumbing, but are one of the simpler types mentioned above.
Pool Leak Detection Tools
- Pressure Testing Equipment; water, air or gas
- Dye Testing Equipment; leak detection dye
- Sonic Testing Equipment; hydrophones and geophones
- Electronic Testing Equipment; LeakTrac 2200
Reasons to Fix Pool Leaks
Pool leaks not only waste your precious treated and heated pool water, but could lead to other problems such as rusted pool walls, or erosion of a sand pool floor or the supporting soil beneath your pool deck or pool equipment pad.