FREE Standard Shipping On All Orders $100 or More!*
How to Test a Pool Pump Capacitor
Testing a Pool Pump's Capacitor

If your pool pump is not starting, but instead gives a 'hum' or a 'nnngh!' type of sound, you may have a capacitor problem. This sound will usually continue until the circuit breaker trips.
The capacitor is kind of like a battery to start the pump motor, but what it really does is put the power out of phase on the stator thus 'shading' the motor windings, causing the motor to begin to turn.
The first thing to check, especially during a spring opening, is that the impeller and motor shaft is turning freely. This will rule out the possibility of rust binding up the rotor and stator, or something heavy stuck in the impeller.
You can check for shaft rotation by removing the rear cover plate, and turning the end of the shaft with a large flathead or straight pliers, or on most pumps, you can remove the basket and feel the impeller with your fingers (pump off first!).

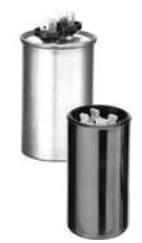
You could just replace the capacitor, to see if that's the problem. Look on the side of the existing capacitor to read the microfarad size - 'MFD' or the UF numbers. Pool pumps may have two capacitors, one in the back (the start capacitor) and one on top (the run capacitor). The smaller, black capacitors, located in the rear of a motor, are usually labeled with a range of numbers, i.e., 161-193 MFD, while the larger, silver capacitors, typically located on the hump of the motor, on top - are sized by a UF number.
If you want to test the capacitor however, follow these instructions - carefully, as there is a small element of danger, should the capacitor blow-up on you!
Before you test your capacitor, take note of it's appearance. If it's bulged, cracked or otherwise looks damaged, you can assume that it has failed. You should also check for loose, crimped or broken wires or rusty terminals or burned marks on the capacitor.
1. Remove the cover plate, and use an insulated screwdriver to discharge the capacitor. If you want, you can remove the capacitor and wrap it in a heavy cloth, or rubber sheet - just in case. It is quite rare that while testing a capacitor, it explodes (small explosion), but it can happen. More commonly, you may experience sparks, or a small popping sound as you drain the capacitor, if there is a lot of power stored. Point the capacitor away from you and others, while discharging. You only need to touch both terminals briefly with the tip of an insulated screwdriver, to discharge the capacitor.
2. Remove the two wires connected to the capacitor, with a small flathead, or needle nose pliers. If the capacitor is bulged or cracked, or looks like it is burned or charred, you can assume that it is D.O.A. and you need a replacement capacitor.
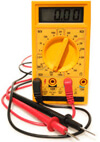
3. Use any type of multi-meter, digital or analog. It need not be a fancy $100 meter, it can be a $10 meter from Radio Shack. Set the test meter to Ohms, of 1K or higher. Touch both leads of your meter to the capacitor terminals, does not matter which lead touches which terminal.
4. If the meter reads zero, and stays at zero - the capacitor is bad. If it slowly rises (to infinity), your capacitor is capable of holding a charge, and a new capacitor is not needed.

A good reading should start low as soon as you touch the second lead to the capacitor, then slowly increase. Use the highest ohm setting you have (2M or 200K works best, as you can slowly see the resistance rising).
You can discharge the capacitor with an insulated screwdriver (wear gloves) and do it again to verify. Just before you touch the second lead, your ohmmeter should be reading 1 (open circuit, infinite resistance), you’ll drop to a low reading right away with a good capacitor and it’ll increase.
Another test is to have the meter set to AC volts, and connected to both leads (I use clamps, I don’t want my hands near live voltage). Turn the pump on, and if the capacitor is running properly, you’ll get a HIGHER voltage than the supply voltage (for example, you may get 260v, with a 240v supply voltage).