10% Off Sitewide Sale + Free Shipping No Minimum*
How to Caulk Your Pool's Expansion Joint
Caulking the expansion joint of your swimming pool is a crucial aspect of pool maintenance that often goes overlooked. Over time, exposure to harsh weather conditions and the natural settling of the pool can cause the sealant in the expansion joint to deteriorate, potentially leading to water infiltration and damage. Whether you're a seasoned pool owner or a newcomer to pool maintenance, understanding this process is vital for preserving the structural integrity of your pool and ensuring its long-term durability.
Who Needs to Caulk?
If you have an inground concrete pool with coping stones, whether brick, flagstone, or pre-cast stones, you will have an expansion joint behind the coping stones to allow for expansion of the pool deck when the weather gets hot. This joint should be caulked around every five years. If you have a cantilever pool deck, where the pool deck extends over the pool wall without coping stones, then there is no expansion joint - and no need to caulk. Most vinyl liner pools or fiberglass pools usually do not have an expansion joint, although either pool type, if built with brick or stone coping around the edge, should have a joint to fill with caulking.
Why Should I Caulk the Expansion Joint?
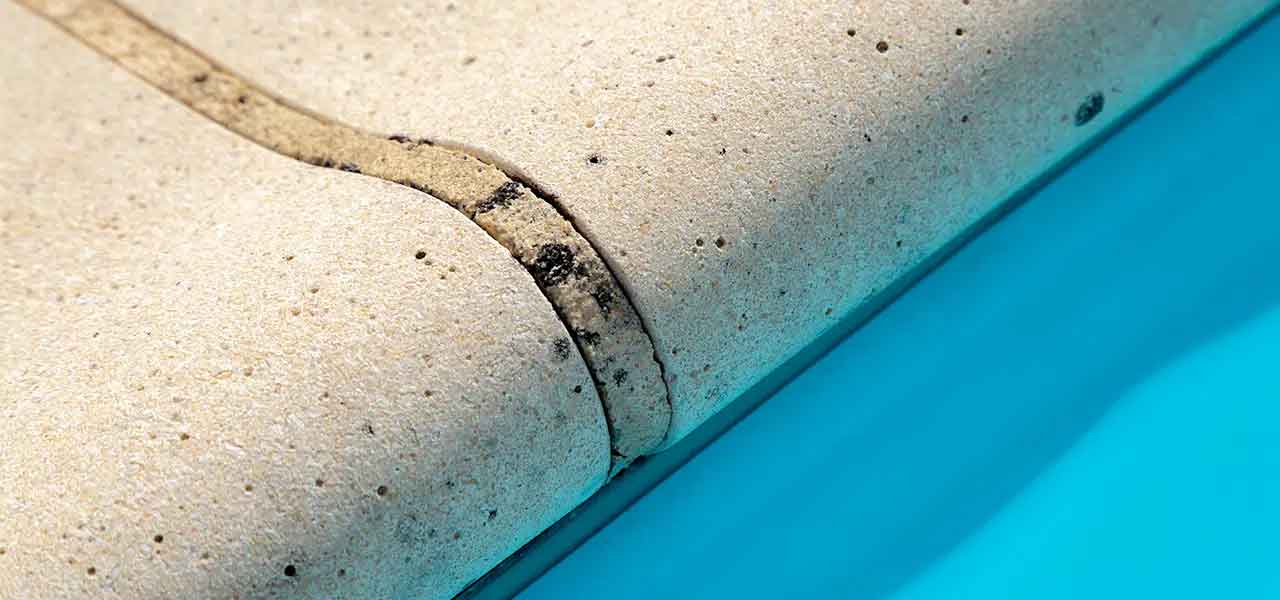
The expansion joint around your pool allows for the pool deck (and the pool itself) to expand when the weather gets hot. As the weather gets warmer, a concrete slab will grow laterally. Almost imperceptively, pool decks can expand 1/4 inch or more in warm weather. The same happens to your pool shell; it grows a little larger when summer heats up, and contracts or shrinks when the weather gets colder.
The expansion joint serves to allow space for the pool deck and the pool wall to expand without knocking into each other. Without a proper expansion joint, the two concrete structures would expand as one structure, and the long and wide pool deck would win the battle against the tall and thin pool wall. Over time, the pressure from the pool deck will break the top of the pool wall, resulting in a major repair called 'beam damage'.
Keeps Debris Out
A proper expansion joint is a gap between the pool wall and pool deck that goes clear to the earth beneath the pool deck. Without caulking in the gap, the gap or space soon fills with sand, pebbles, seeds, dirt, etc. When the joint fills with such non-compressible stuff, this removes the gap, and the two structures will move as one. Bad news for the pool wall.
Keeps Out Water
Water can also cause problems during the winter. When the expansion joint is not 'proper', but partially filled with debris, rain and snow melt will stand in the gap and freeze. We all know what happens when water freezes, it expands - nearly 10% in size. Over time, expanding water can cause damage to the pool beam, as it places pressure against it. Or water will seep into areas under the coping, or behind the tile, freeze and expand, loosening mortar, tile and stone. Ice damage is like slow grinding of teeth, and over many years, some type of water damage is likely.
So, the reason that pool caulk is necessary (besides looking nice) is that caulking keeps water and debris out of the joint and prevents some very common and expensive problems for your pool wall.
How to Caulk Your Pool
When building a new pool, contractors use a foam strip against the back of the coping stones as a form for pouring the pool deck. It works poorly as a base to set your pool caulking on top, because it's usually not tight enough against both sides to prevent the pool caulk from running down in the joint.
1. Remove the old caulk
For pools that have been previously caulked, remove the old caulking with a long blade razor knife, moving around the pool slowly (and carefully!). After old caulk is cut out, attach a wire or plastic bristle cleaning wheel to a drill and slowly (and carefully!) grind the top 1/4" of both sides, to remove dirt and oils that will affect the bond with the new caulk. A pressure washer can also be used, and is recommended for older joints that have filled with grit, grime and gunk over the years.
2. Place the backer rod
After the joint is dry, a round foam rod known as backer rod is pushed into the expansion joint as the preferred method to provide a support base for the caulk, so it doesn't run down, and to create a consistent depth of caulking. Don't use sand. Sand is not very compressible, and remember that we want to keep debris such as sand out of the expansion joint.
You can purchase a backer rod in various widths, with sizes available up to 1" in diameter. Buy the size that is slightly larger than the widest part of your joint. If your expansion joint width varies by a significant amount, you can buy different lengths of different widths. You can also use a razor knife to carefully trim a larger backer rod to size.
Place the backer rod into the expansion joint to a consistent depth of 1/4" below the deck or coping, whichever side is lower. Don't push it in too deep or you will use a lot of caulking bringing it up to level. And if it's not level, you will get standing water, which will grow algae, which looks awful. If it gets too deep, use a small screwdriver or hooked pin to pull it up. Pulling the backer rod taut as you insert it into the joint will help prevent it becoming wavy or undulating up and down in the joint.
3. Add caulk
When the backer rod is in place, check again that it is smooth and at a consistent depth. Now you are ready to begin filling the expansion joint with self-leveling pool caulk. It's called self-leveling because it is slightly runny and will level itself - as opposed to gun-grade caulk which has a putty consistency and must be placed in the joint with a small trowel or putty knife. Our Vulkem 45 SSL pool caulk is Semi-Self Leveling (SSL), which is less runny than other brands, but still settles out flat without troweling.
Buy the large tubes of caulk as this prevents having to change the tubes too often. Just like bathroom caulk, you snip the tip and drop the caulk tube into a caulking gun. Go easy on the trigger, it comes out fast and can get messy real quick. You can find large caulking guns at any home or hardware store.
Whenever you need to stop, place the caulking gun onto the cardboard quickly. Continue in this manner around the pool, moving backwards as you squirt the pool caulk into the expansion joint.
Pool Caulking Tips
Here's some other tips for a clean caulking job:
- Wear old clothes and shoes. This can get messy.
- Keep the pets and kids away from the pool area for 24 hours.
- Keep several moist rags and cardboard around the pool.
- Blow off the deck first to prevent blowing leaves.
- Do the job when the weather is cool; the caulk is less runny.
- Check the weather for rain forecasted in the next 24 hours.
- Be sure the joint is dry before caulking.
- Caulk your pool in 50° - 80°F temperatures.