10% Off Sitewide Sale + Free Shipping No Minimum*
Anthony Apollo VA-52 DE Pool Filter Repairs
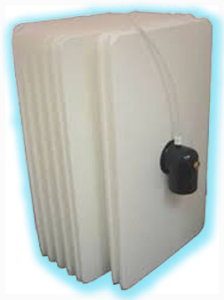
One of my favorite pool filters out there is a vertical grid DE filter, made by Purex for Anthony Pools. The vertical grid arrangement is easy to clean, and the DE powder doesn't bridge as easily as filters with curved DE grids.
There are plenty of pool guys out there who will tell you to "replace that old filter" - but it could be the best pool filter ever made, and it's easy to repair. If they don't want to repair it, you can do it yourself!
The Anthony Apollo DE filters were used from 1970-1995, which means that Anthony installed around 100,000 of the Apollo filters, by my own estimate. They are now out of production, discontinued, obsolete - however, replacement parts are still available, with the exception of the tank body, or tank halves.
So, as long as the stainless steel Anthony DE filter tank doesn't develop pinholes (usually caused by poor water chemistry), you could rebuild this filter many times, for less than the cost of replacing it. Did I mention that I LOVE this filter?
How to Remove Anthony Vertical DE Filter Grids
When DE powder is blowing into the pool, or if you notice holes in the grids last time you cleaned them, you can replace individual grids, or the entire set of 6 large and 4 small grids. First step is to backwash the filter thoroughly to remove most of the DE powder and then shut the power off at the breaker. Open the air bleeder on top of the tank, to allow the tank to drain out of the backwash line.
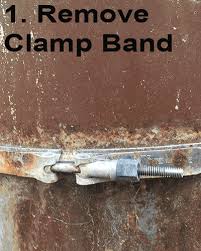
1. Remove the clamp band. Be careful with these old clamps to avoid twisting the welds or stripping the nut. Use a 9/16" socket or wrench (not a crescent wrench!), to loosen the soft brass nut from the bolt. When the nut is completely off, remove the clamp band.
2. Remove the filter lid. This may require a flathead screwdriver inserted between the tank halves to gently pry apart the two lid halves. Once loose, give the filter top a bear hug, pull the lid off and gently set it to the side to avoid dinging and denting the tank or the scalloped edges. The edges of the tank halves can be sharp, so be careful.
3. Open the retainer clip on one end of the horizontal rod, or thru-bolt. Once the clip is open, grab the filter rod beneath the clip and with your other hand, grasp the 90 degree fitting that connects to the filter, on the other end of the rod. Wiggle it a bit as you pull upward. When wet and caked with DE powder, the grids can be heavy, which may require two people to lift it out of the tank.
4. Remove the grid set to a place where you can hose it off clean. This will make the job much less messy, as you begin to take apart the grid assembly.
How to Replace Anthony Pools DE Filter Grids
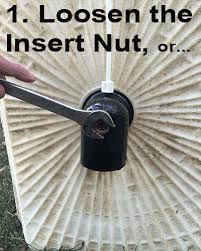
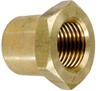
1. On the end of the 90° fitting, there is a brass insert nut, internally threaded to screw onto the end of the brass rod. Use a 3/4" socket or wrench to remove it in a CCW direction.
2. Alternatively, instead of loosening the insert nut, you can loosen the set screw on the opposite end of the rod, on the flange part known as the end bell, using a 5/32" hex key. In most cases, this step can be skipped, as there is no need to remove the end bell when the insert nut (step 1) can be successfully removed.
3. If the brass rod begins to spin as you turn the brass insert nut, clamp the opposite end of the rod with a pair of vice grips, to hold the rod in place, while the brass insert is threaded off of the end of the rod.
4. When needed, which is most of the time), use some water-displacement 40 (WD-40) or other light penetrating oil, to loosen the brass insert nut, and make it easier to remove.Be careful not to overspray onto the filter grids.
Reassembling Anthony Apollo DE Filter Grids
Sorry, no pictures for this part, but if you have successfully removed the rod from the center of the Anthony grids, you will easily see how the grid assembly comes apart, and thus is put back together.
Anthony DE grids are separated by plastic spacers, which come in two widths, 1" for the VA-38 and 1.5" for the VA-51 and VA-52, which have the 1.5" collection elbow and the 2" collection elbow, respectively. The spacers are constructed so that they press fit into the grids.
To reassemble an Anthony grid assembly, it's easier to have a second set of hands to help hold the assembly together, or you can use two bricks or blocks to lay the grid set onto, with the end bell facing the ground and the other end facing the sky. Stack the grids, alternating with spacers, lightly pushing the spacer into the round hole of each grid.
For the VA-51 and VA-52, a complete grid set has two small grids on each end, with 6 large grids in the middle. This allows the grid assembly to conform to the cylindrical shape of the filter tank. The VA-38 filter is narrower, and uses three small grids on each side, with 2 large grids in the middle.
Once all of the grids and spacers are stacked and pressed, slide the collection elbow over the rod and thread on the brass insert nut. Tighten down smoothly, ensuring that the spacers are pressed into the grids on both side of each spacer.
Pop the grid assembly back in the tank, clean the tank body o-ring (replace it if it is no longer round, but triangular shaped), and replace the filter lid. Be extra careful tightening the clamp band, being sure that it is centered, and tapped lightly with a small hammer while the nut is tightened. Don't overtighten, which could strip the nut or break the welds, but be sure that the clamp is not under-tightened, either.
For Anthony Apollo grids, and all other Anthony filter parts mentioned above, click here.